- Step 1. Visit the website https://my.vimail.vn/ and follow the instructions to create a new email campaign "Broadcasts"
- Step 2. Fill in the necessary information for your email campaign
- Step 3. Choose the design you want
- Step 4. Choose a template we have designed and modify the design to your liking.
- Step 5. Redesign the template to your liking
- Step 6. Fill in the necessary information for your email campaign
- Step 7. Continue entering the necessary information
- Step 8. View campaign statistics
- Step 9. View detailed statistics about your email campaign
Sending marketing emails is one of the 4 main features of vimail.
If you have an email list of your potential customers and you want to send a beautiful email to promote your product, please follow these instructions:
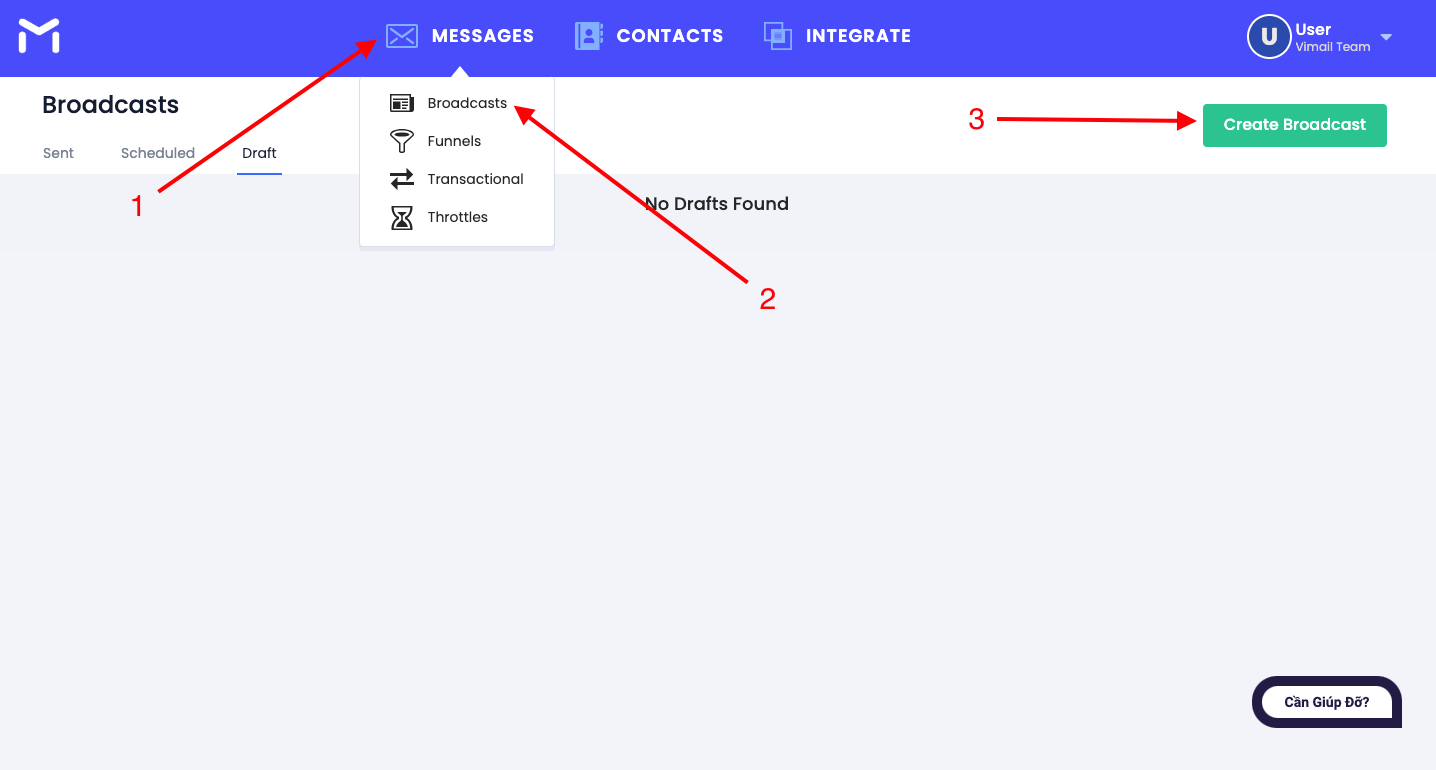
Step 1. Visit the website https://my.vimail.vn/ and follow the instructions to create a new email campaign “Broadcasts” #
Step 2. Fill in the necessary information for your email campaign #
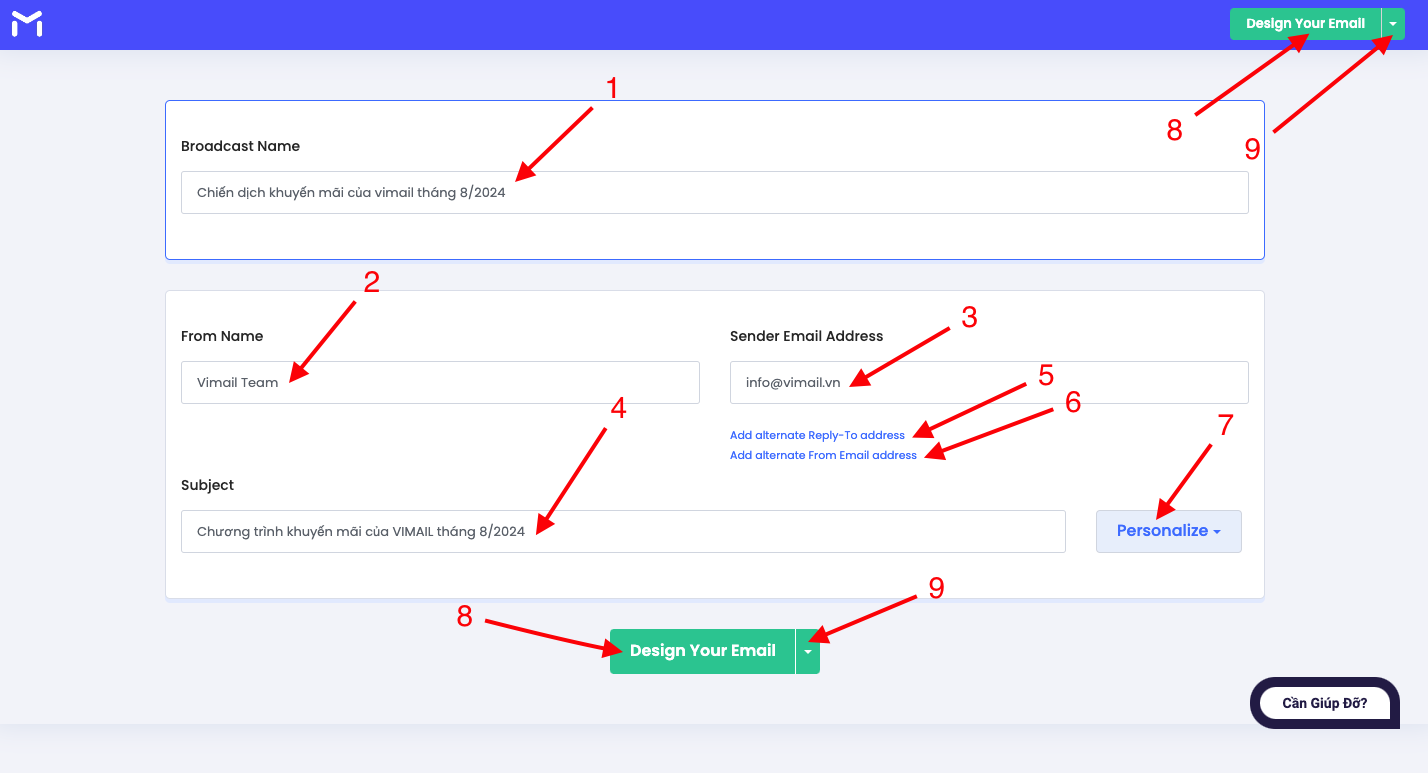
- 1. Name your email campaign
- 2. Sender's name
- 3. The email address you use to send emails
- 4. Your email subject line
The above 4 contents are required in an email campaign, in addition you can refer to additional features upon request:
- 5. Reply-to email address: is the email address that when users receive an email and click the reply button, they will send a reply email to this address, not the email address you use to send marketing emails. (Optional feature)
- 6. From email: This is the email address that will be used to establish your sender reputation with mailbox providers and to which replies will be routed if contacts respond to your message. (Optional feature)
- 7. Personalize: This feature adds a wildcard string to your customer's personal information that you store in your contact list. (Optional feature)
See the example below to better understand this feature number 7.
For example: You want to send a marketing email with the email title "Happy Birthday" to the customer's name, get a discount code now. And you have a list of 100 customers including the customer's name and email. You cannot create and send each email to each customer because it is very time-consuming and confusing. You just need to fill in box number 4 "Happy Birthday" then click on the feature Personalize Then select the customer name in the email list and continue to fill in "get discount code now.". After successfully creating the campaign, the system automatically takes the customer name in the contact list you have to fill in the email title.
- 8. If you plan to design email marketing using Vimail's email design software, please click on button number 8
- 9. If you want to use your html file to send, or send email in text format please press number 9
Step 3. Choose the design you want #
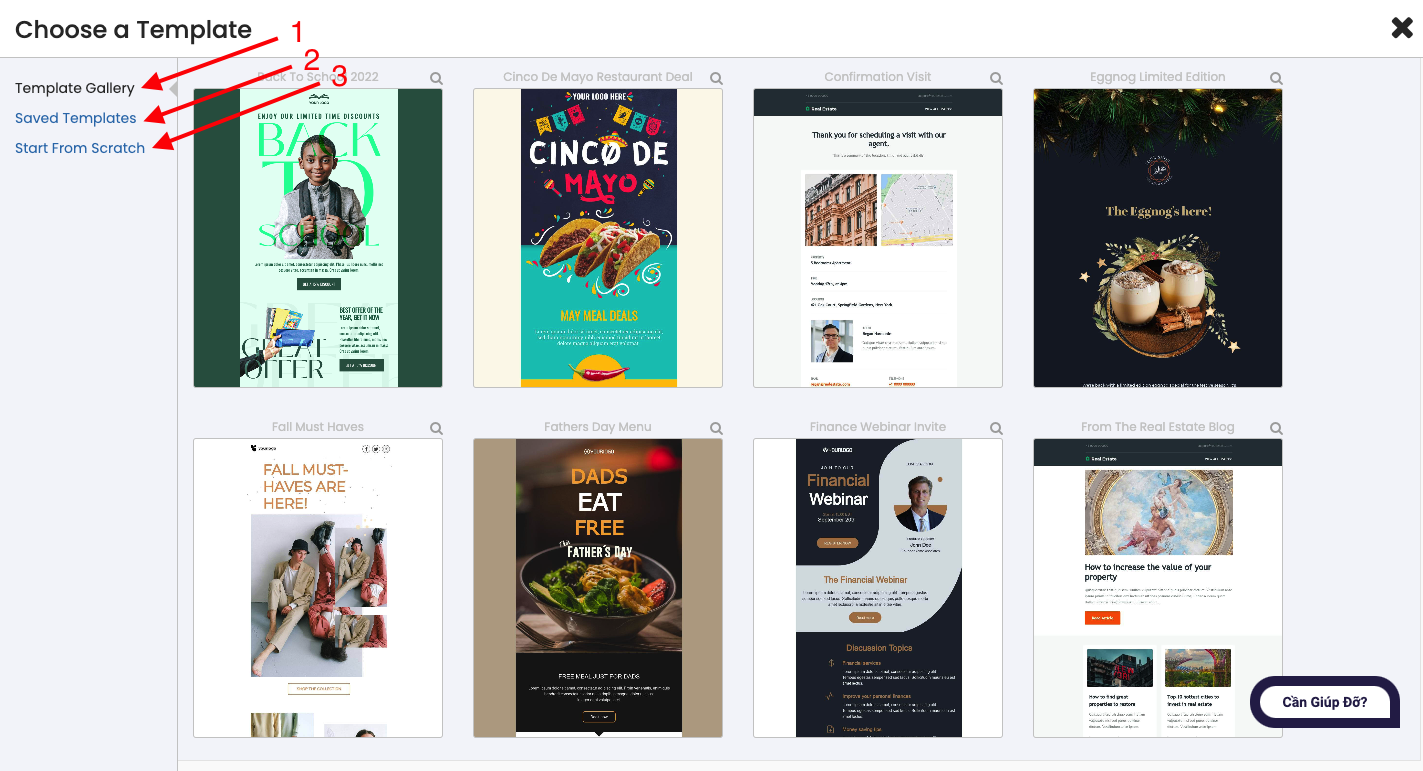
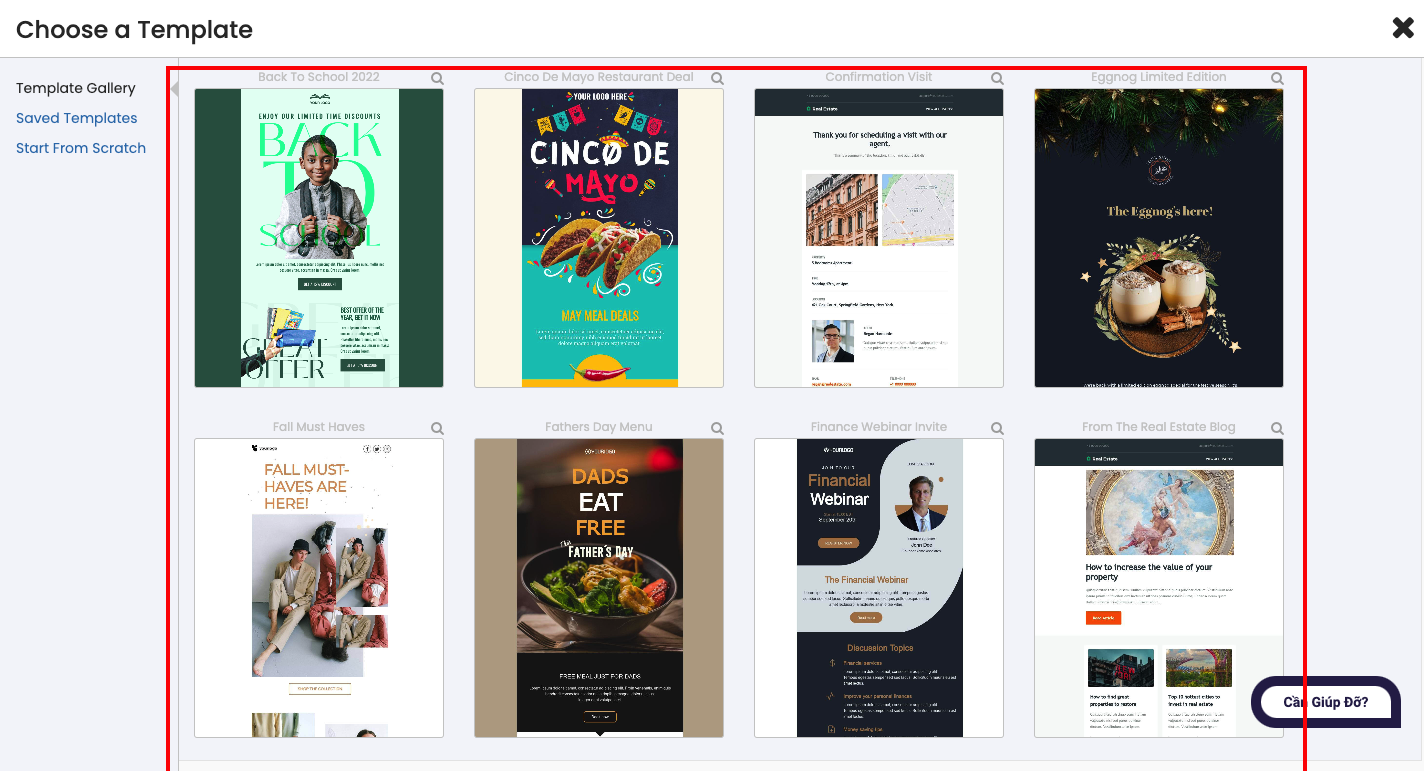
- 1. Choose a template we have designed and then edit it.
- 2. Select the template you have designed in previous campaigns
- 3. Start with a blank template and then design it yourself
Step 4. Choose a template we have designed and modify the design to your liking. #
Step 5. Redesign the template to your liking #
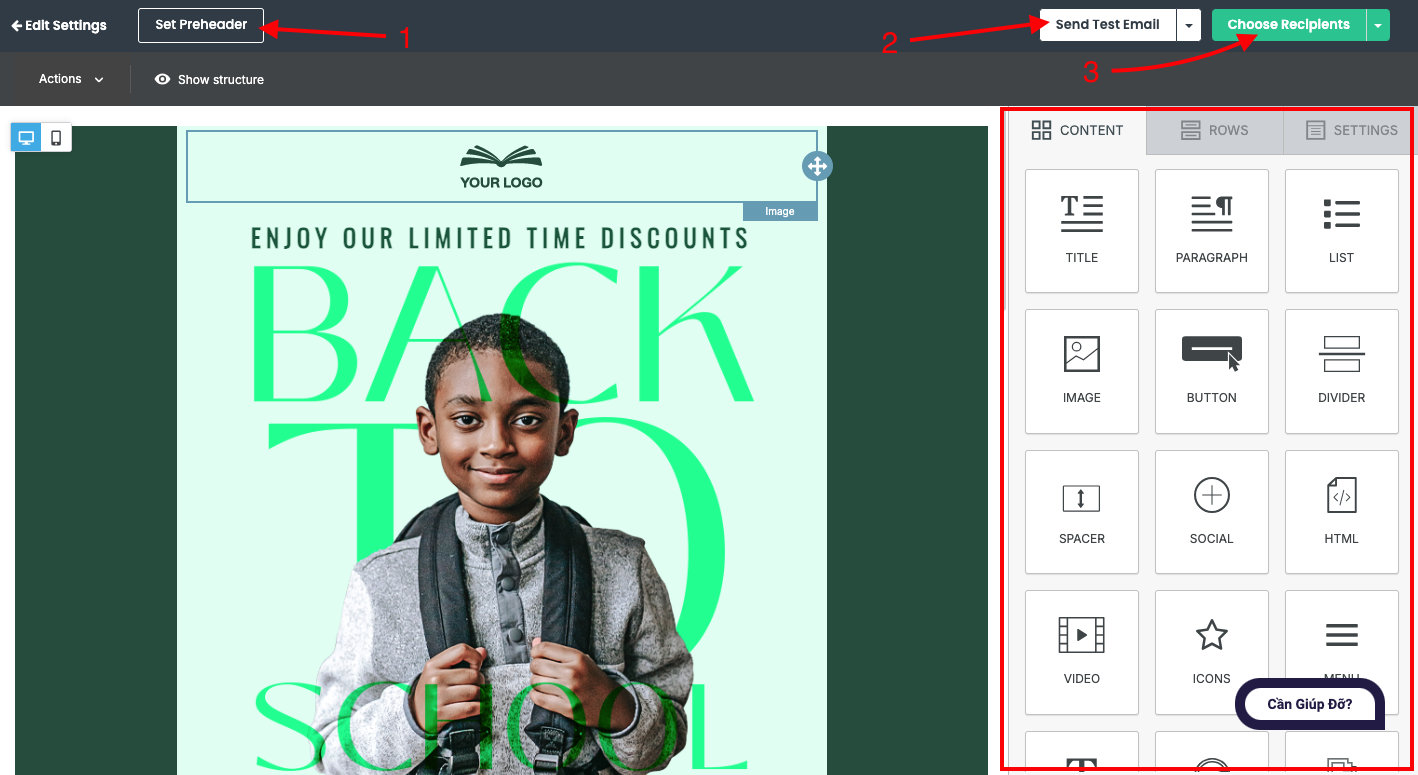
In this step, you are free to create your favorite email template according to the available features that vimail provides.
To learn how to use vimail's email marketing interface creation software, please see the following instructions: Instructions for creating email templates using vimail
- 1. Set Preheader is a feature that creates a preview text on emails. This text appears after the email subject and before the email content when the email has not been opened. The purpose is to help users better understand the content of the email received.
To learn more about Preheader Please see the following instructions: What is a preheader?
- 2. Send Test Email is a feature used to send test emails to recipients you choose to test in advance to show you what the email your customers will receive will look like.
To learn more about Send Test Email Please see the following instructions: Instructions for sending test emails
- 3. After finishing the design, please click on button number 3 to continue.
Step 6. Fill in the necessary information for your email campaign #
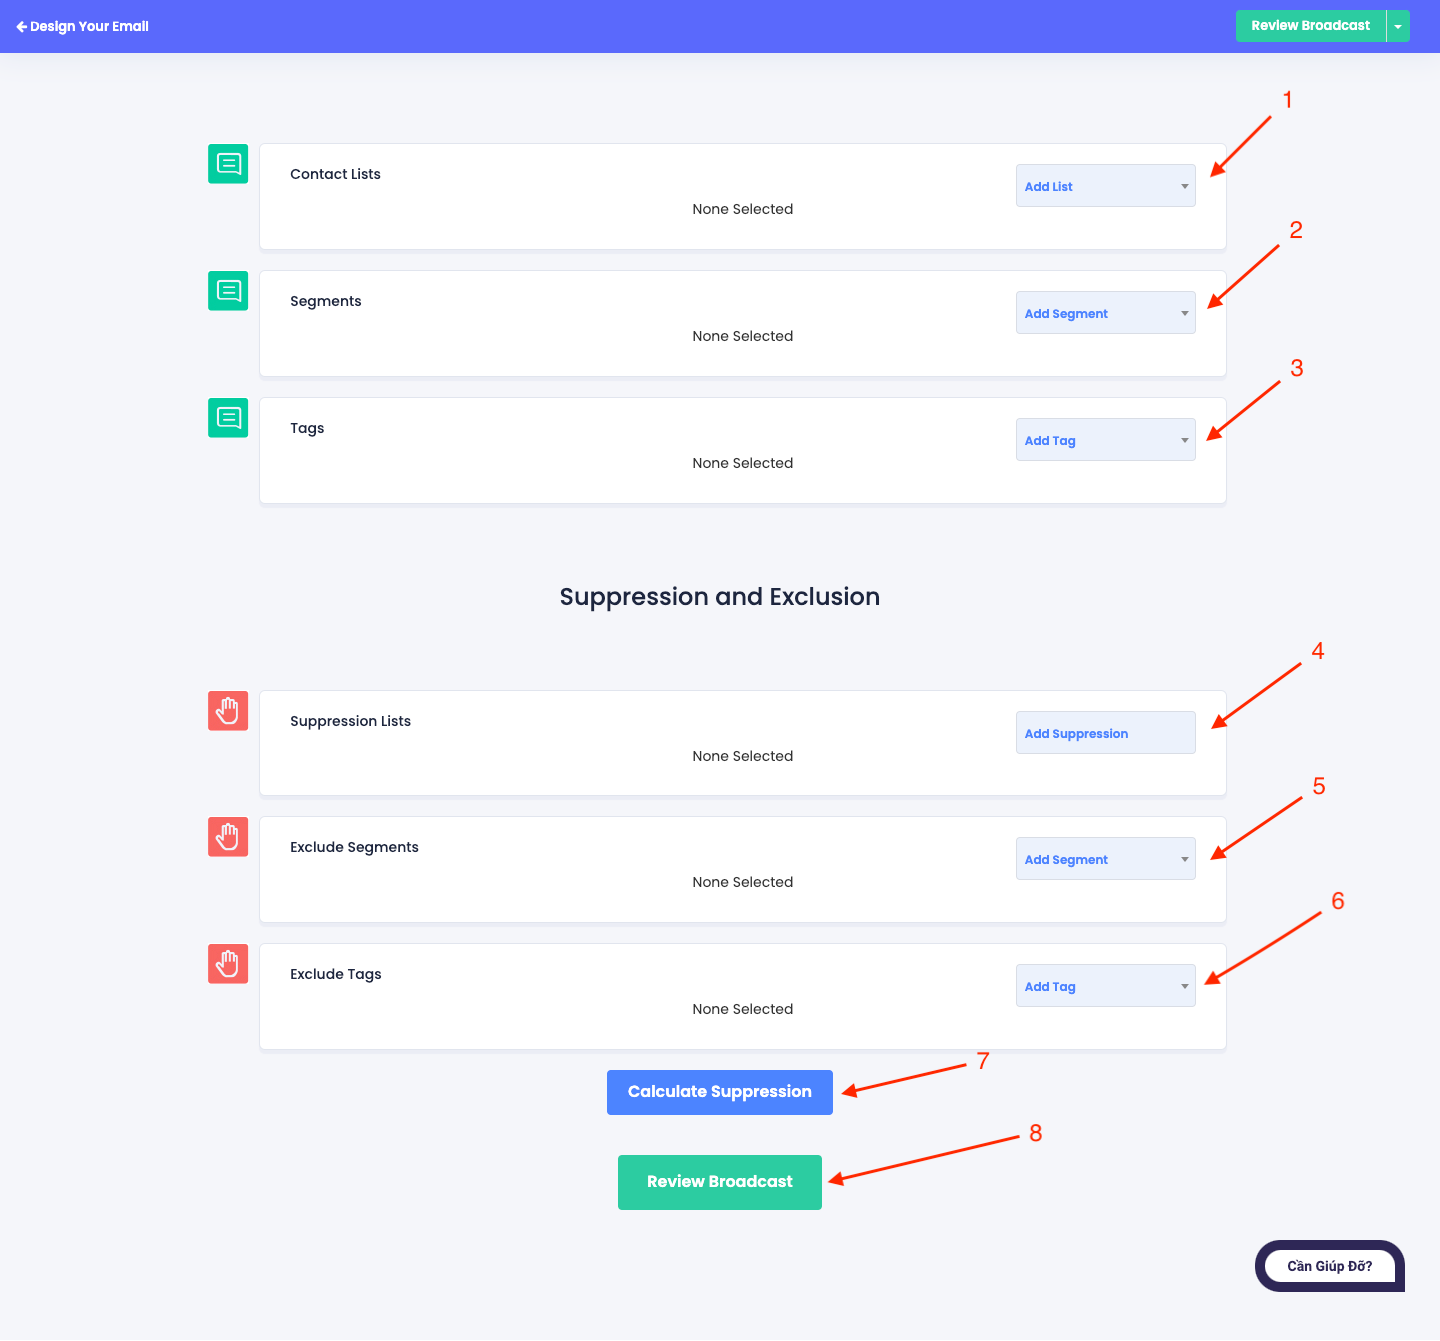
First, you must choose 1 of the 3 ways below to make a mailing contact list.
- 1. Select the contact list you want to send the email to.
- 2. Select the customer segment you want to send emails to.
- 3. Select the customer card you want to send the email to.
To create a contact list, please see the following instructions: Instructions for creating a contact list on Vimail
To create a tag for your contact list, please see the following instructions: Instructions for creating tags for contact lists
To create a contact list segment, please see the following instructions: Instructions for creating “Segments” for contact lists
This step is required to be able to send marketing emails, the remaining steps are advanced features, if you do not understand you can skip them and do not need to fill them in.
- 4. Select the list of customers you do not want to send marketing emails to
- 5. Select the customer segment you do not want to send marketing emails to
- 6. Select the customer tags that you do not want to send marketing emails to
- 7. Calculate the number of emails you can send after you enter the features 1 2 3 4 5 6
- 8. After completing the necessary information, press button number 8 to continue.
Step 7. Continue entering the necessary information #
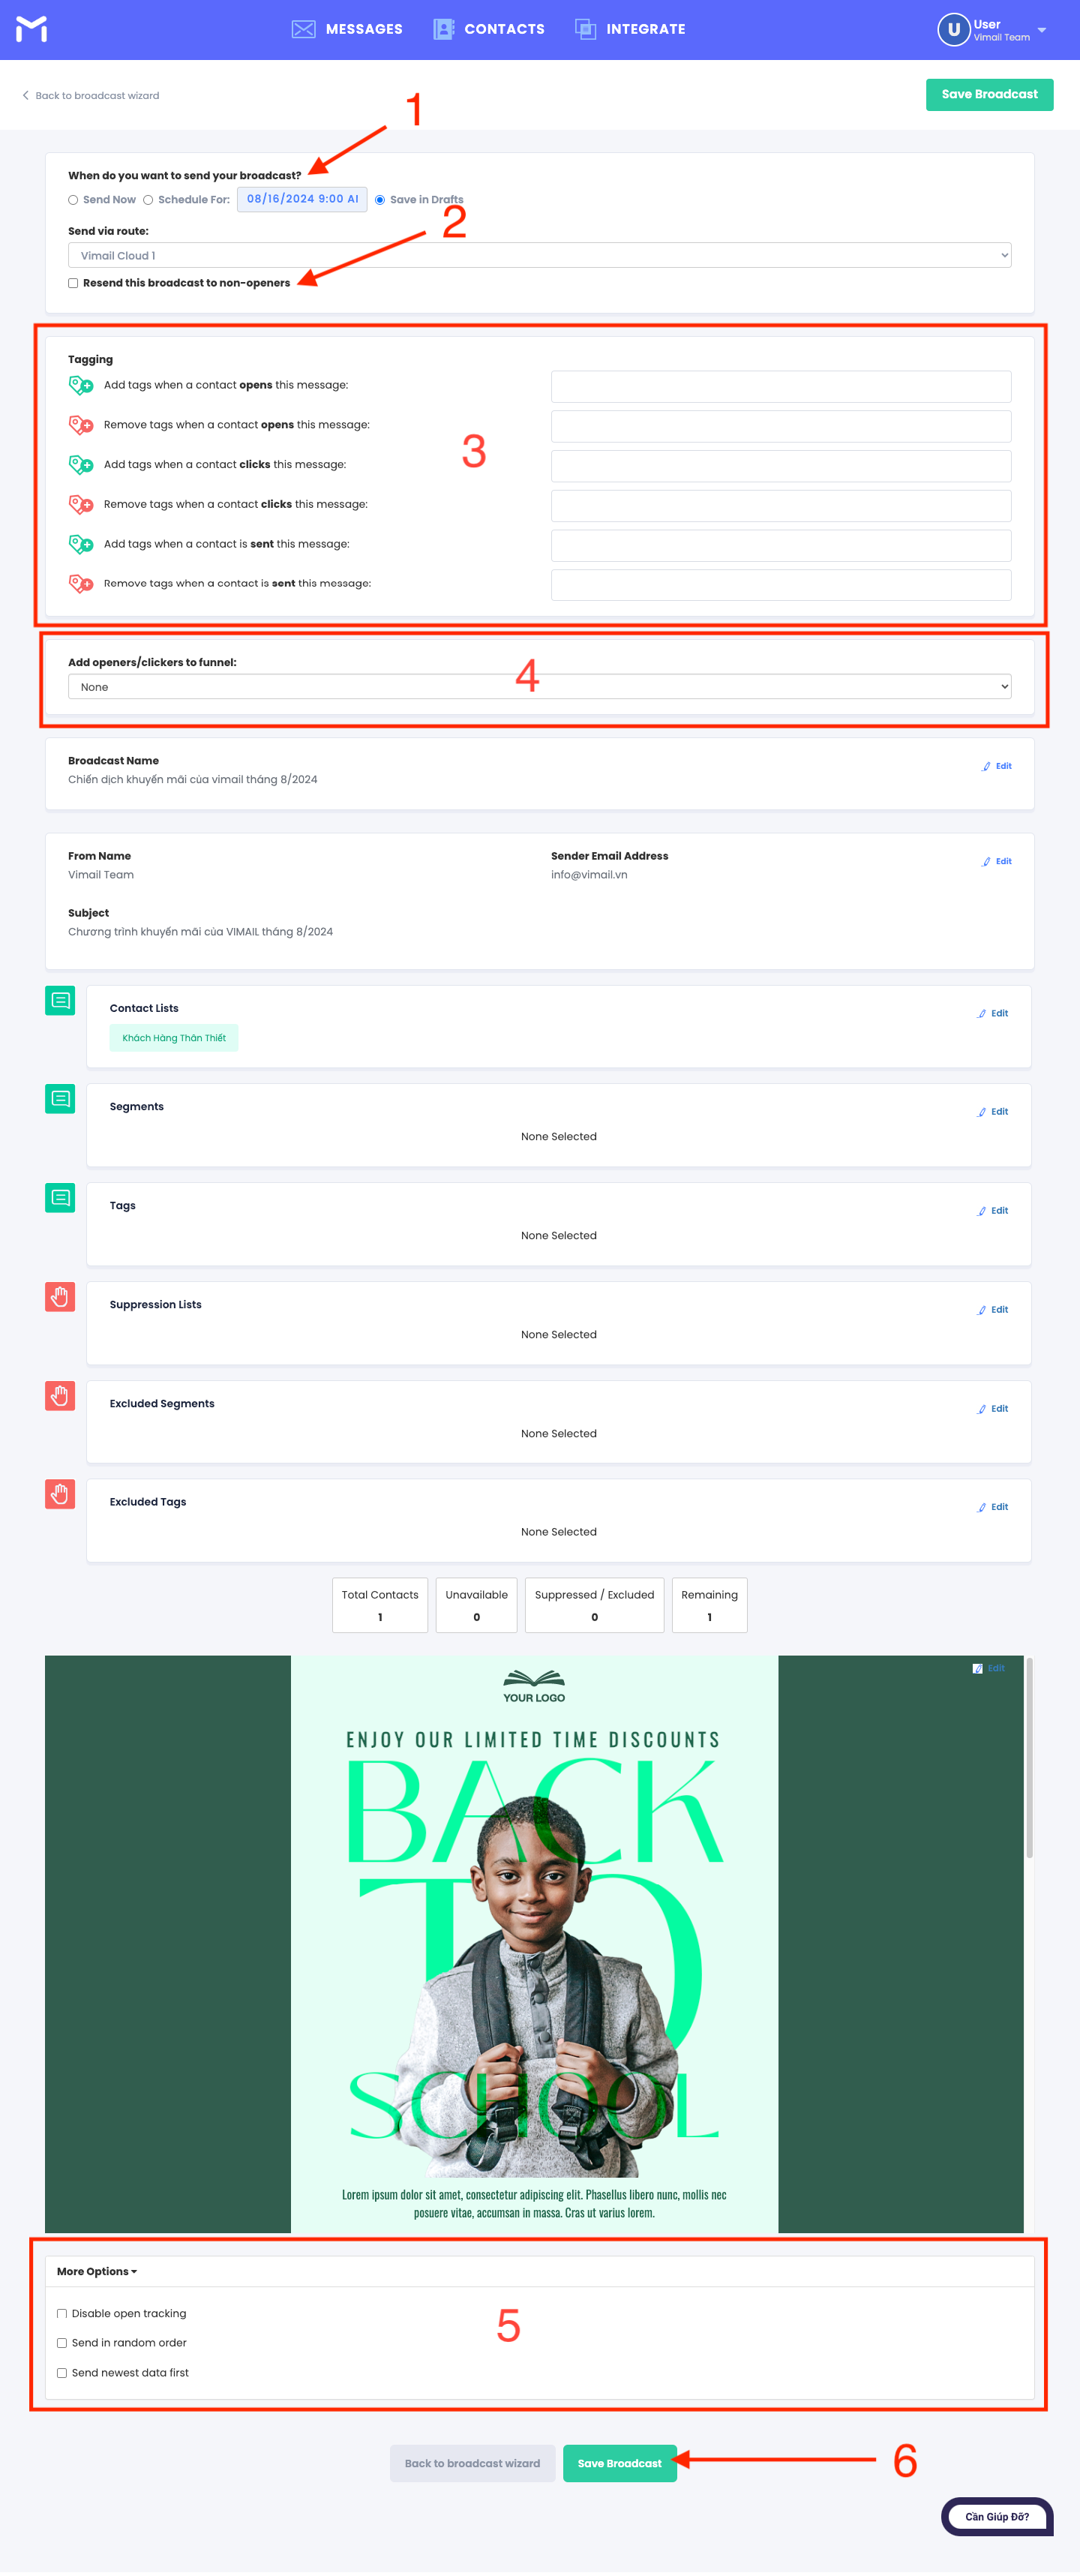
- 1. Choose the time you want to send your email marketing campaign: Now, schedule send, save to draft.
- 2. If a customer receives an email but doesn't read it, you can set this feature to resend the email to the customer after a period of time with a new title and Preheader.
- 3. Select the action to add or cancel the card after the customer performs one of the following actions: successfully sending the email, opening the email, clicking on the link inside the email.
- 4. Add customers who read the email/clicked on the link inside to an automation process.
- 5. Select additional features:
Disable open tracking: Do not install tracking and statistics features
Send in random order: Send emails in random order
Send newest data first: Send emails in order of newest people added to the email list will be sent first
- 6. Once you have completed the necessary information and checked the content, Press button number 6 to send your email campaign to your customers.
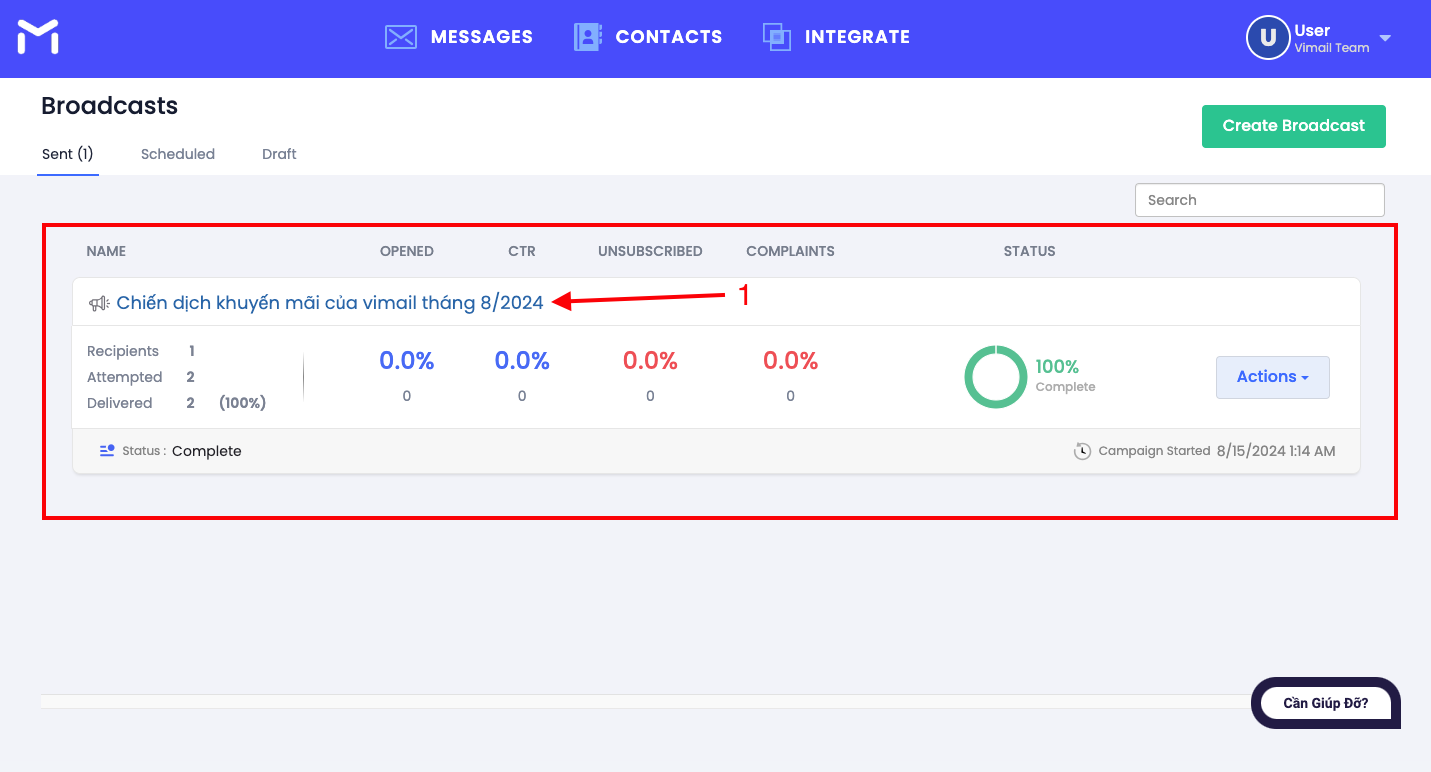
Step 8. View campaign statistics #
At this step, your email marketing campaign has been automatically sent to your customers by the system. Depending on the email package you purchase, the system will automatically customize the speed of sending emails and distributing emails to contacts in your contact list.
Click on the campaign name to view detailed campaign statistics.
Step 9. View detailed statistics about your email campaign #
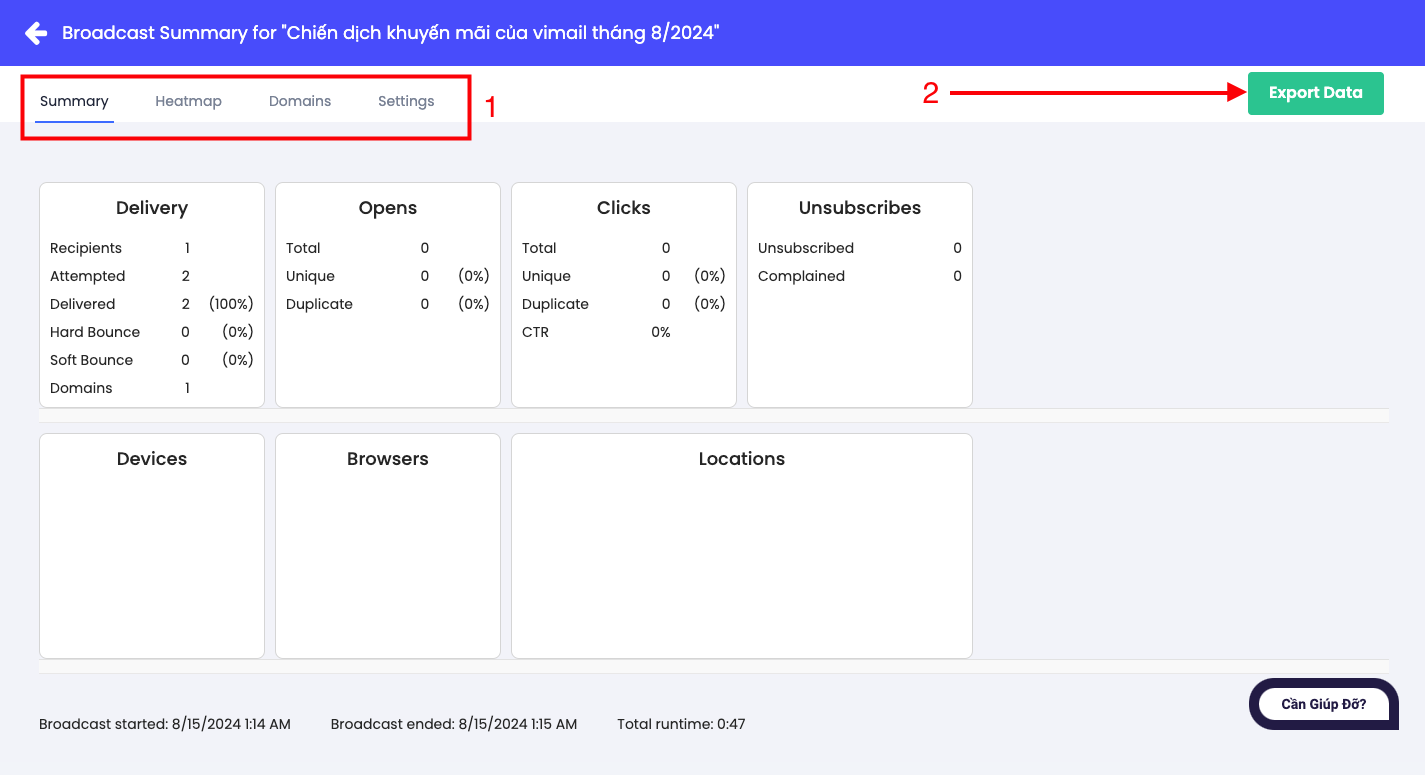
- 1. You can see the following parameters:
Summary: Key information about the campaign
Heatmap: See how many times a link in your email is clicked
Domains: View campaign statistics based on classification by email receiving domain
Settings: Review the settings for the email marketing campaign you previously set up.
- 2. You can export data to save using button number 2
