Vimail Vimail
  • en_US
    vi
  • Home
  • Features
  • Pricing
  • Document
  • News
  • Contact
Log in
Vimail Vimail
  • Home
  • Features
  • Pricing
  • Document
  • News
  • Contact
  • Log in
  • en_US
  • vi

Register

3
  • Instructions for registering a vimail account
  • Instructions for purchasing additional emails
  • Team

For Beginners

1
  • Steps needed to master Vimail

Email By Domain Name

1
  • Instructions for registering email by domain name

Contact List

8
  • Instructions for creating your contact lists manually “Contact Lists”
  • Instructions for importing CSV file of customer data into Vimail “Contact Lists”
  • Instructions for adding customer tags to contact lists
  • How to create a “Suppression Lists”
  • Instructions for creating “Exclusions Lists”
  • Instructions for creating “Segments” for contact lists
  • Export your contact list
  • GDPR Compliance

Email Marketing

8
  • Instructions for sending marketing emails using vimail “Broadcasts”
  • Instructions for sending traditional text marketing emails “Broadcasts”
  • Instructions for sending marketing emails using HTML file “Broadcasts”
  • How to use vimail email template builder
  • Instructions for sending test emails
  • What is a preheader?
  • Email footer
  • Instructions for the feature of limiting the number of emails sent by minute, hour, day "Domain Throttles"

Forms & Popups

3
  • Instructions on how to create forms and popups to collect customer information “Forms”
  • Instructions for using the form designer and Popup to collect customer information
  • How to Insert Forms and Vimail Popups into WordPress Website

Customer Funnel

2
  • Instructions for creating an automatic email marketing process “Funnel”
  • A/B Testing

SMTP & API

2
  • Instructions for creating an API connection to connect vimail with your website or application
  • Instructions for creating an SMTP connection to connect vimail to your website, application

Customer Support

4
  • How to contact support
  • Change password
  • Forgot Password
  • Accepted payment methods
View Categories
  • Home
  • Document
  • Forms & Popups
  • Instructions for using the form designer and Popup to collect customer information

Instructions for using the form designer and Popup to collect customer information

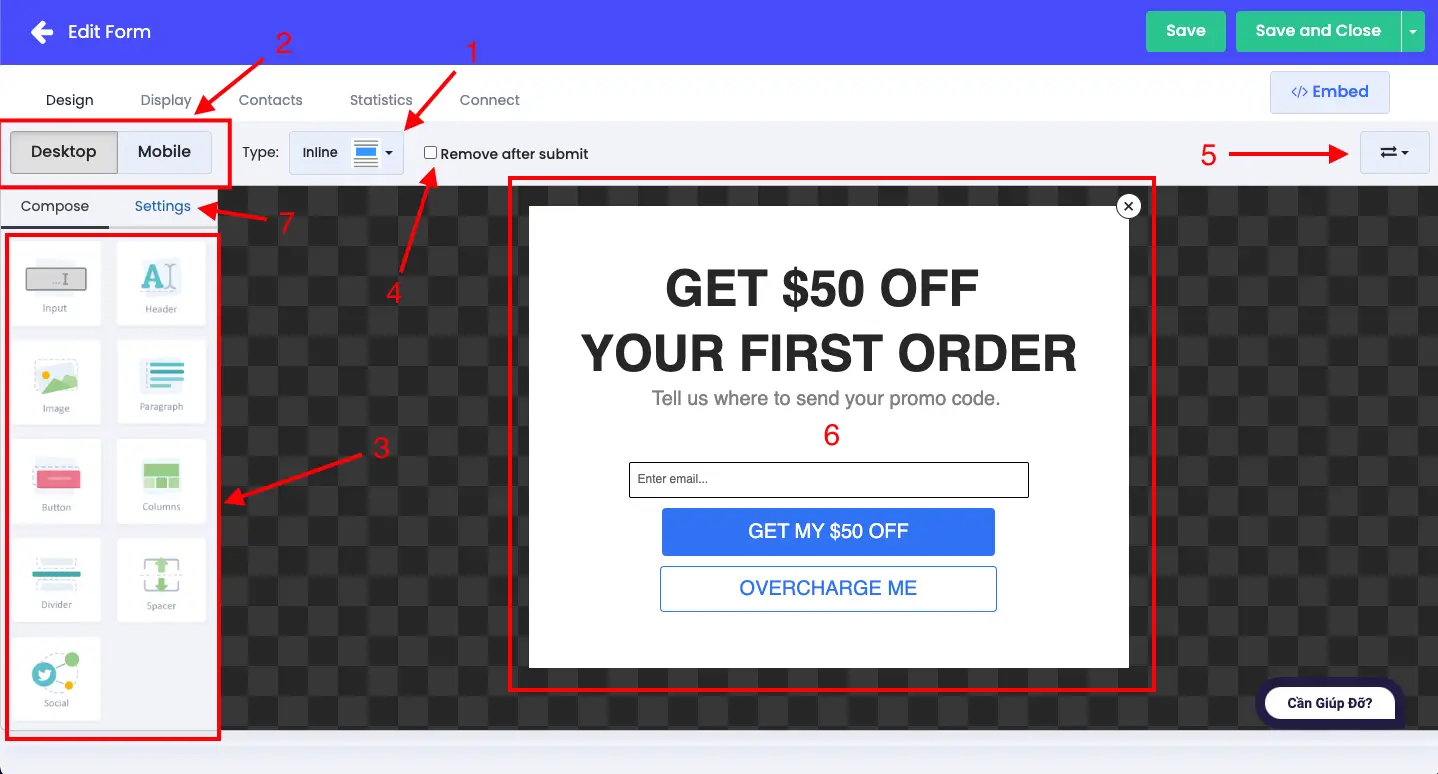
Bước 1. Truy cập vào trình thiết kế biểu mẫu của bạn #

  • 1. Chọn 1 trong 4 loại biểu mẫu mà bạn cần tạo:

Slide: Hiện biểu mẫu ở 1 góc trong website

Hello: Hiện biểu mẫu dạng baner trên đầu trang hoặc chân trang website.

Modal: Hiện biểu mẫu dạng popup trên website

Inline: Hiển thị biểu mẫu trực tiếp tại nơi chèn code

  • 2. Chọn 1 trong 2 giao diện biểu mẫu mà bạn có thể sửa: Giao diện máy tính và giao diện điện thoại
  • 3. Các phần tử mà bạn có thể thêm vào biểu mẫu
  • 4. Chọn tùy chọn này để biểu mẫu sẽ không hiển thị lại sau khi người dùng đã nhập thông tin vào biểu mẫu
  • 5. Tùy chọn này dùng để copy biểu mẫu từ giao diện máy tính sang giao diện điện thoại và ngược lại.
  • 7. Các tùy chọn chung cho biểu mẫu

Instructions for using the form designer and Popup to collect customer information

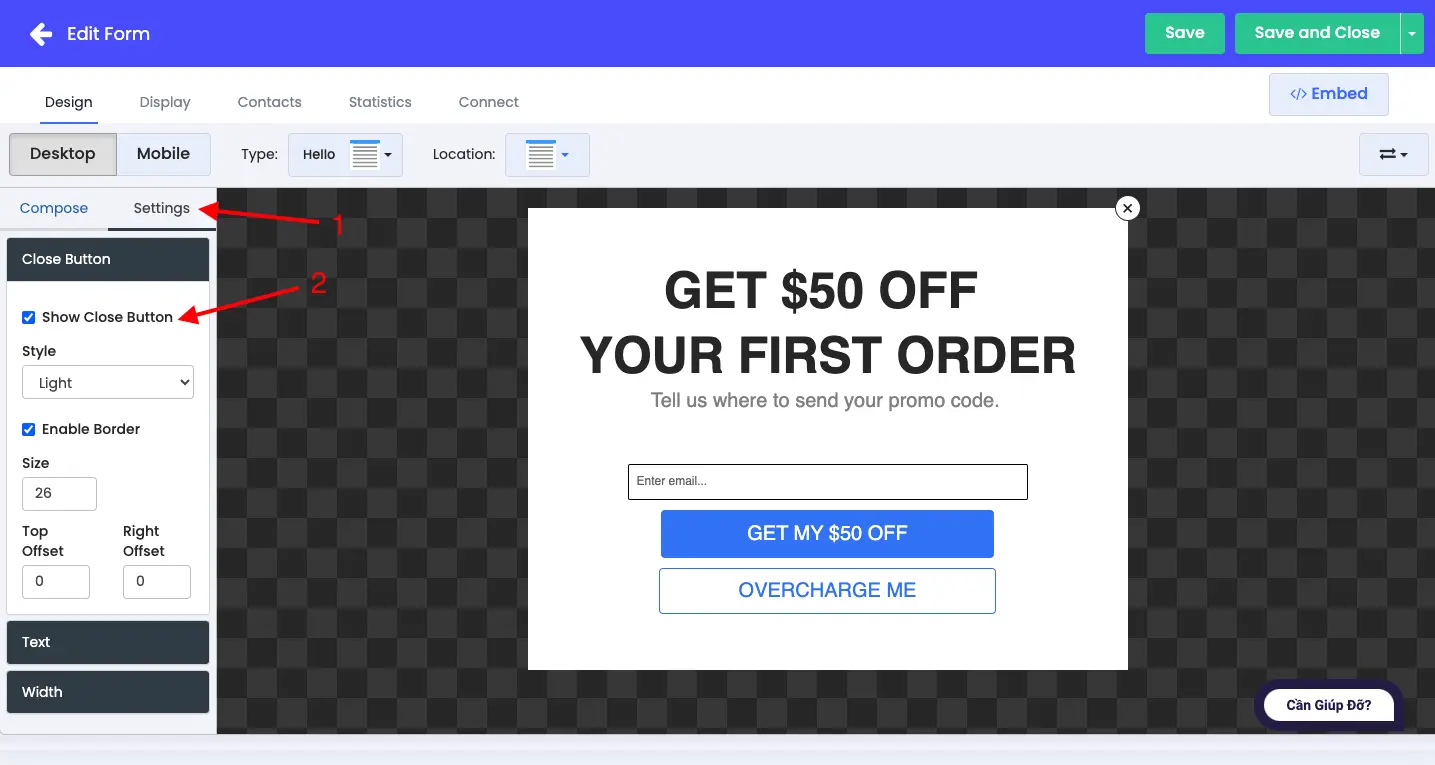
Chọn như hình bên dưới để thêm nút X tắt biểu mẫu vào biểu mẫuInstructions for using the form designer and Popup to collect customer information
 

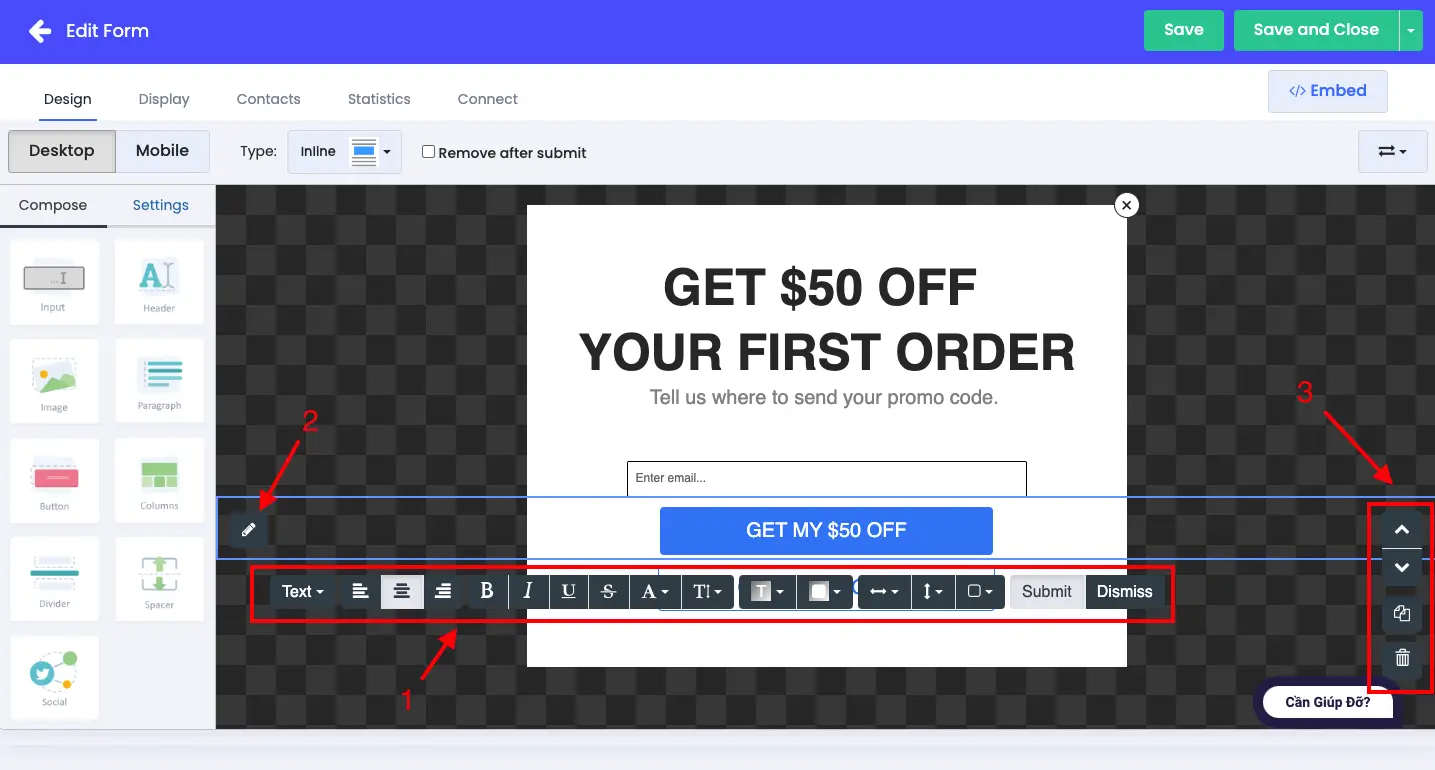
Bước 2. Chỉnh sửa biểu mẫu bằng cách nhấn vào các phần tử cần chỉnh sửa #

  1. Các công cụ để chỉnh sửa phần tử
  2. Các công cụ để chỉnh sửa bên ngoài của phần tử
  3. Các công cụ di chuyển, sao chép, xóa phần tử
Instructions for using the form designer and Popup to collect customer information

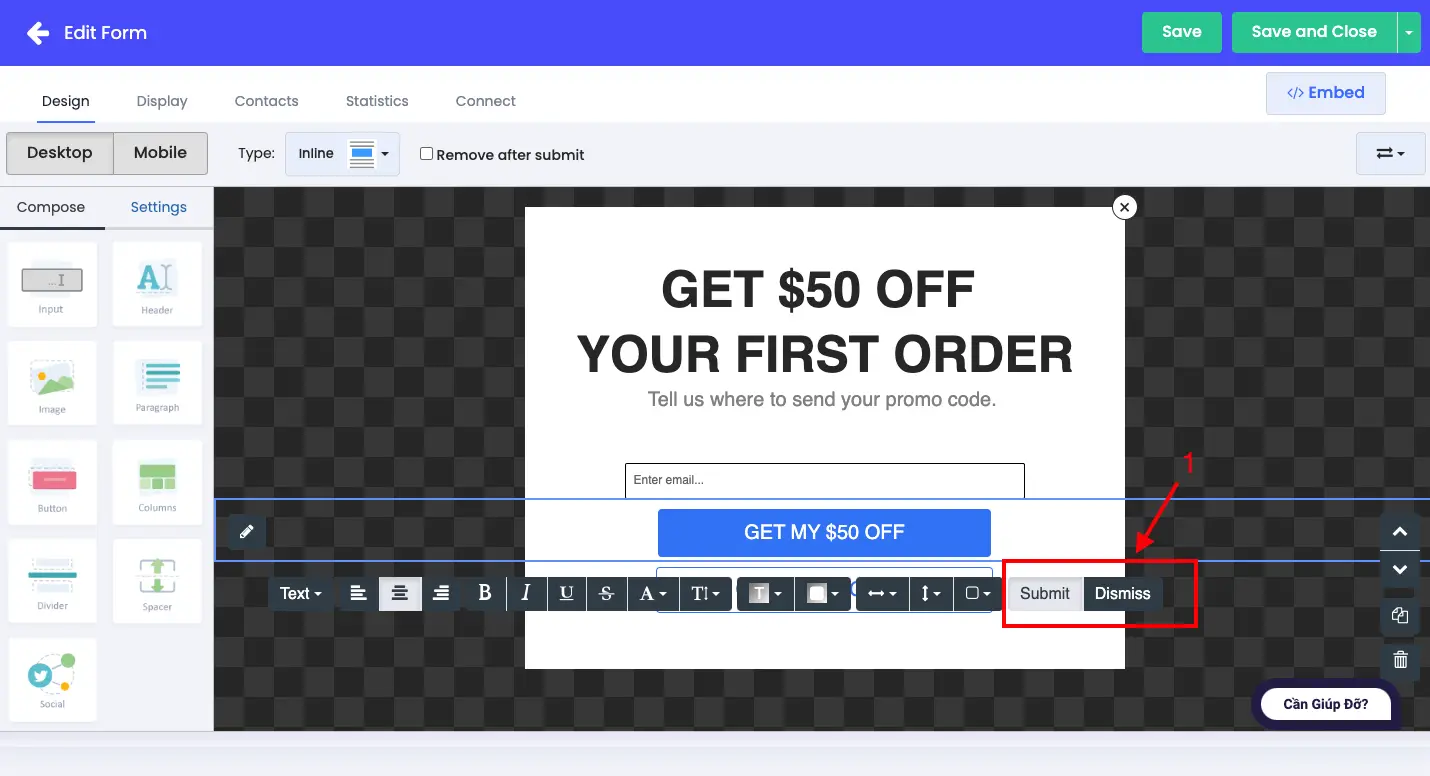
Bước 3. Tạo nút nhập thông tin và nút thoát #

Để tạo “nút gửi thông tin” và “nút tắt biểu mẫu không nhập thông tin”, bạn tạo một nút trống và chọn như hình 1.

Submit: Nút này để người dùng xác nhận gửi thông tin lên hệ thống Vimail

Dismiss: Nút này dùng để người dùng tắt popup và không gửi thông tin lên hệ thống Vimail

Instructions for using the form designer and Popup to collect customer information #


Updated on 21/08/2024

What are your Feelings

  • Happy
  • Normal
  • Sad

Share This Article :

  • Facebook
  • X
  • LinkedIn
  • Pinterest
Instructions on how to create forms and popups to collect customer information “Forms”How to Insert Forms and Vimail Popups into WordPress Website
Index
  • Bước 1. Truy cập vào trình thiết kế biểu mẫu của bạn
  • Bước 2. Chỉnh sửa biểu mẫu bằng cách nhấn vào các phần tử cần chỉnh sửa
  • Bước 3. Tạo nút nhập thông tin và nút thoát
Image link
Do you want to do email marketing?
Try Vimail for free now!
Try It Free
Vimail

Email Marketing software is simple, fast, effective and economical.

Category
About Us
Features
Document
Contact
Policy
Terms of Service
Privacy Policy
Cookie Policy
Refund Policy

Vimail © 2024

We've detected you might be speaking a different language. Do you want to change to:
vi Tiếng Việt
vi Tiếng Việt
en_US English
Change Language
Close and do not switch language
cookies By using this website, you agree to Cookie Policy. Close